用Roofline模型去分析pytorch和Triton算子
- 1.参考链接
- 2.测试环境
- 3.安装相关依赖
- 4.锁频
- 5.获取理论算力
- 6.创建测试脚本
- 7.运行测试程序生成Roofline图
- 8.NVIDIA Nsight Compute生成Roofline
- 9.效果图
- A.nn.Linear
- B.Triton实现
本文演示了如何用Roofline模型去分析pytorch和Triton算子
遗留问题:NVIDIA Nsight Compute中的Peak Work是怎么算出来的,又不是峰值算力 -> Nsight Compute 是怎么计算Roofline的呢
1.参考链接
- roofline-overview
- rtx-3060
- OpenAI Triton
2.测试环境
+---------------------------------------------------------------------------------------+
| NVIDIA-SMI 535.161.07             Driver Version: 535.161.07   CUDA Version: 12.2     |
|-----------------------------------------+----------------------+----------------------+
| GPU  Name                 Persistence-M | Bus-Id        Disp.A | Volatile Uncorr. ECC |
| Fan  Temp   Perf          Pwr:Usage/Cap |         Memory-Usage | GPU-Util  Compute M. |
|                                         |                      |               MIG M. |
|=========================================+======================+======================|
|   0  NVIDIA GeForce RTX 3060        On  | 00000000:03:00.0 Off |                  N/A |
|  0%   48C    P5              29W / 170W |     18MiB / 12288MiB |      0%      Default |
|                                         |                      |                  N/A |
+-----------------------------------------+----------------------+----------------------+
torch==2.3.1+cu121
3.安装相关依赖
export LD_LIBRARY_PATH=$LD_LIBRARY_PATH:/usr/local/cuda/lib64
export PATH=$PATH:/usr/local/cuda/bin
export CUDA_HOME=$CUDA_HOME:/usr/local/cuda
pip install pycuda
4.锁频
MAX_Graphics_CLOCK=`nvidia-smi -q -d SUPPORTED_CLOCKS | grep 'Graphics' | sed 's/[^0-9]//g' | sort -n | uniq | tail -n 1`
MAX_Memory_CLOCK=`nvidia-smi -q -d SUPPORTED_CLOCKS | grep 'Memory' | sed 's/[^0-9]//g' | sort -n | uniq | tail -n 1`
nvidia-smi -pm 1
nvidia-smi -lgc $MAX_Graphics_CLOCK,$MAX_Graphics_CLOCK
nvidia-smi -i 0 -ac $MAX_Memory_CLOCK,$MAX_Graphics_CLOCK
nvidia-smi -q -d CLOCK
5.获取理论算力
tee Theoretical_FLOPS.py <<-'EOF'
import pycuda.driver as cuda
import pycuda.autoinit

def get_gpu_compute_capability_and_clock_rate():
    device = cuda.Device(0)
    compute_capability = device.compute_capability()
    clock_rate = device.get_attribute(cuda.device_attribute.CLOCK_RATE)  # in kHz
    sm_count = device.get_attribute(cuda.device_attribute.MULTIPROCESSOR_COUNT)
    cores_per_sm = get_cuda_cores_per_sm(compute_capability)
    return compute_capability, clock_rate, sm_count, cores_per_sm

def get_cuda_cores_per_sm(compute_capability):
    major, minor = compute_capability
    if major == 2:
        return 32
    elif major == 3:
        return 192
    elif major == 5:
        return 128
    elif major == 6 and minor in [0, 1]:
        return 64
    elif major == 6 and minor == 2:
        return 128
    elif major == 7 and minor in [0, 5]:
        return 64
    elif major == 7 and minor == 2:
        return 64
    elif major == 8 and minor in [0, 6]:
        return 128
    else:
        raise ValueError("Unknown compute capability")

def calculate_theoretical_flops(clock_rate, sm_count, cores_per_sm):
    clock_rate_hz = clock_rate * 1e3  # Convert kHz to Hz
    flops = clock_rate_hz * sm_count * cores_per_sm * 2  # 2 FLOPs per clock per core (FMA)
    return flops

compute_capability, clock_rate, sm_count, cores_per_sm = get_gpu_compute_capability_and_clock_rate()
theoretical_flops = calculate_theoretical_flops(clock_rate, sm_count, cores_per_sm)
print(f"GPU compute capability: {compute_capability}")
print(f"Clock rate (kHz): {clock_rate}")
print(f"Number of SMs: {sm_count}")
print(f"Cores per SM: {cores_per_sm}")
print(f"Theoretical FLOPS for float32: {theoretical_flops / 1e12} TFLOPS")
EOF
python Theoretical_FLOPS.py
输出
GPU compute capability: (8, 6)
Clock rate (kHz): 1852000
Number of SMs: 28
Cores per SM: 128
Theoretical FLOPS for float32: 13.275136 TFLOPS
6.创建测试脚本
tee roofline_model.py <<-'EOF'
import sys
import torch
import torch.nn as nn
import triton
import triton.language as tl
import math
import torch
import torch.nn as nn
from fvcore.nn import FlopCountAnalysis, ActivationCountAnalysis
import matplotlib.pyplot as plt
import numpy as np
from matplotlib.font_manager import FontProperties
import os
import argparse
# 定义一个测试模型
class SimpleModel(nn.Module):
def __init__(self,input_features,output_features):
super(SimpleModel, self).__init__()
self.fc1 = nn.Linear(input_features,output_features,bias=False)
def forward(self, x):
x = self.fc1(x)
return x
@triton.jit
def sgemm_kernel(
A, B, C,
M, N, K,
stride_am, stride_ak,
stride_bk, stride_bn,
stride_cm, stride_cn,
BLOCK_SIZE: tl.constexpr
):
""" Kernel for computing C = A @ B """
# Define the program ids
pid_m = tl.program_id(0)
pid_n = tl.program_id(1)
# Create base pointers for A and B and C
offs_am = pid_m * BLOCK_SIZE + tl.arange(0, BLOCK_SIZE)
offs_bn = pid_n * BLOCK_SIZE + tl.arange(0, BLOCK_SIZE)
offs_ak = tl.arange(0, BLOCK_SIZE)
a_ptrs = A + (stride_am * offs_am[:, None] + stride_ak * offs_ak[None, :])
b_ptrs = B + (stride_bk * offs_ak[:, None] + stride_bn * offs_bn[None, :])
# Initialize accumulator
acc = tl.zeros((BLOCK_SIZE, BLOCK_SIZE), dtype=tl.float32)
# Loop over K dimension
for k in range(0, K, BLOCK_SIZE):
a = tl.load(a_ptrs, mask=offs_am[:, None] < M)
b = tl.load(b_ptrs, mask=offs_bn[None, :] < N)
acc += tl.dot(a, b)
a_ptrs += BLOCK_SIZE * stride_ak
b_ptrs += BLOCK_SIZE * stride_bk
# Write back results
c_ptrs = C + stride_cm * offs_am[:, None] + stride_cn * offs_bn[None, :]
tl.store(c_ptrs, acc, mask=(offs_am[:, None] < M) & (offs_bn[None, :] < N))
class TritonLinear(nn.Module):
def __init__(self, in_features, out_features):
super(TritonLinear, self).__init__()
self.in_features = in_features
self.out_features = out_features
self.weight = nn.Parameter(torch.randn(out_features, in_features).float()).cuda()
def forward(self, x):
assert x.shape[1] == self.in_features
out = torch.empty((x.shape[0], self.out_features), device=x.device, dtype=x.dtype).cuda()
grid = lambda META: (math.ceil(x.shape[0] / META['BLOCK_SIZE']), math.ceil(self.out_features / META['BLOCK_SIZE']))
sgemm_kernel[grid](
x, self.weight, out,
x.shape[0], self.out_features, self.in_features,
x.stride(0), x.stride(1),
self.weight.stride(0), self.weight.stride(1),
out.stride(0), out.stride(1),
BLOCK_SIZE=64
)
return out
def main(args):
# 模型和输入数据
input_features = 8192
output_features = 8192
batch_size = 8192
model = SimpleModel(input_features,output_features)
input_data = torch.randn(batch_size, input_features)
test_count=10
# 计算 FLOPs 和内存访问量
flops = FlopCountAnalysis(model, input_data).total()*test_count
activations = ActivationCountAnalysis(model, input_data).total() + input_data.numel()
print("activations:",activations)
# 计算参数个数
params = sum(p.numel() for p in model.parameters())
# 内存访问量假定为 activations 和params 乘以 4 字节(假设 activations 和 params 是 float32 类型)
activation_memory_access = activations * 4
params_memory_access = params * 4
memory_access = activation_memory_access + params_memory_access
memory_access=memory_access*test_count
if args.triton_kernel:
model = TritonLinear(in_features=input_features, out_features=output_features)
else:
model=model.cuda()
input_data=input_data.float().cuda()
for i in range(5):
output = model(input_data)
torch.cuda.synchronize()
if args.warmup_only:
return
if False:
# 设置 CUDA 事件用于计算执行时间
start_event = torch.cuda.Event(enable_timing=True)
end_event = torch.cuda.Event(enable_timing=True)
start_event.record()
for _ in range(test_count):
output = model(input_data)
end_event.record()
torch.cuda.synchronize()
total_cuda_time = start_event.elapsed_time(end_event) / 1000 # 转换为秒
else:
# 使用 PyTorch Profiler 计算 FLOPs、内存访问和执行时间
with torch.profiler.profile(
activities=[torch.profiler.ProfilerActivity.CUDA]) as prof:
for _ in range(test_count):
output = model(input_data)
key_averages = prof.key_averages()
for ev in key_averages:
print(ev)
total_cuda_time = sum([event.self_cuda_time_total for event in key_averages if event.key.find("sgemm")>=0]) / 1e6 # 转换至秒
# FLOPs 转换至 GFLOPs
flops_measured_glops = flops / 1e9
# 内存带宽测量
memory_access_gb=memory_access/ 1e9
bandwidth_measured = memory_access_gb / total_cuda_time # 单位:GB/s
print("bandwidth_measured:",bandwidth_measured)
# GPU 的峰值性能和带宽
peak_performance = 13.275136 * 1e3 # 单位:GFLOPs
memory_bandwidth = 360.0 # 单位:GB/s
# 计算 Roofline 模型中的数据点
Io = np.logspace(-2,4,100) #GFLOPs/GB
performance = np.minimum(peak_performance, Io * memory_bandwidth) #不同计算密度下的最大FLOPs/S,上限为峰值算力peak_performance
# 绘制 Roofline 模型
plt.figure(figsize=(10, 6))
thresold=0.75
# 设置字体以支持中文
font_path = 'simsun.ttc' # 在这里替换为你的字体路径
font_prop = FontProperties(fname=font_path)
# Bandwidth Bound
x=Io[Io<(peak_performance / memory_bandwidth)]
plt.fill_between(x, np.minimum(peak_performance, x * memory_bandwidth)*thresold,
np.minimum(peak_performance, x * memory_bandwidth),
color='lightblue', alpha=0.6, label='Bandwidth Bound')
# Compute Bound
x2=Io[Io>=(peak_performance / memory_bandwidth)]
plt.fill_between(x2, np.minimum(peak_performance, x2 * memory_bandwidth)*thresold,
np.minimum(peak_performance, x2 * memory_bandwidth),
color='green', alpha=0.6, label='Compute Bound')
# 绘制低性能区域
plt.fill_between(Io, 0, np.minimum(peak_performance, Io * memory_bandwidth)*thresold,
color='gray', alpha=0.6, label='poor performance')
plt.axhline(y=peak_performance, color='b', linestyle='--',
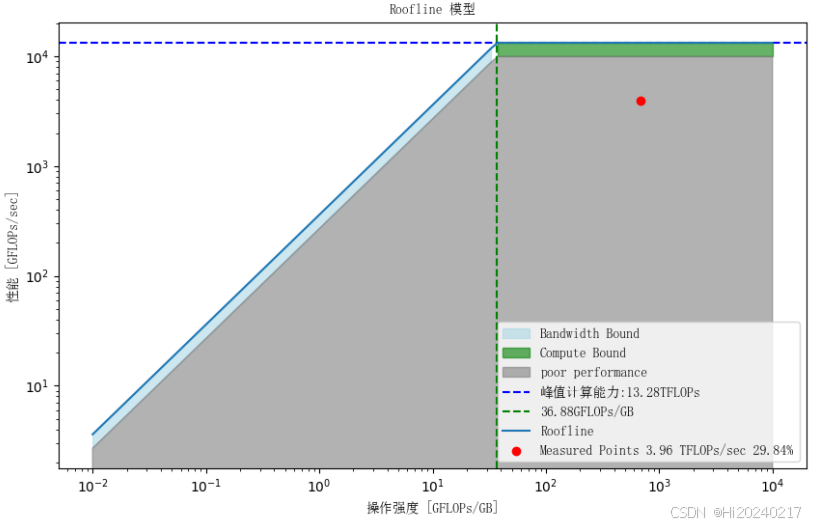
label=f'峰值计算能力:{peak_performance/1e3:.2f}TFLOPs')
plt.axvline(x=peak_performance / memory_bandwidth, color='g', linestyle='--',
label=f'{peak_performance / memory_bandwidth:.2f}GFLOPs/GB')
plt.loglog(Io, performance, label='Roofline')
arithmetic_intensity_measured=flops_measured_glops/memory_access_gb #GFLOPs/GB(算法的静态属性)
point_y = arithmetic_intensity_measured*bandwidth_measured
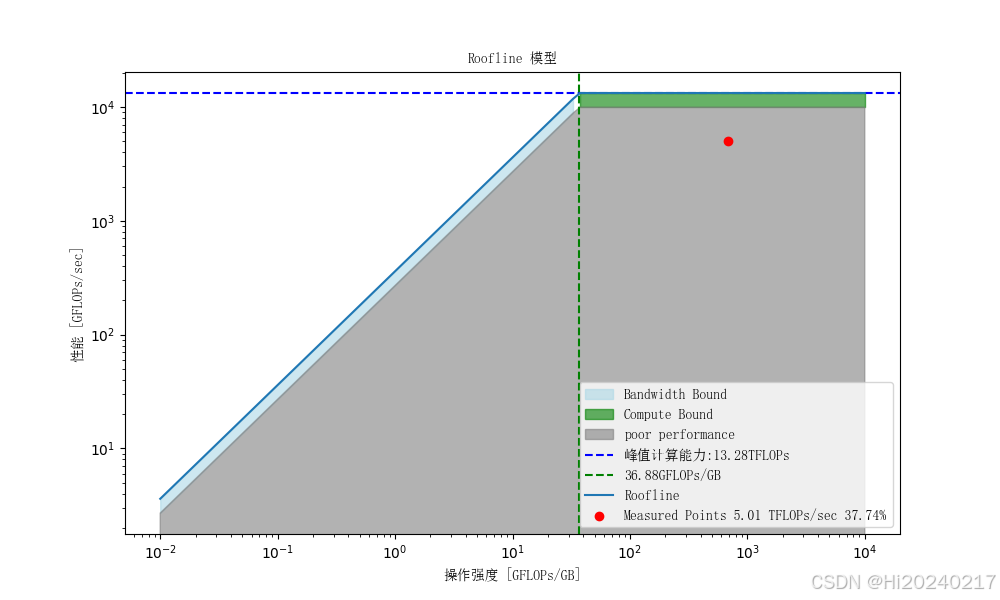
plt.scatter(arithmetic_intensity_measured, point_y, c='r',
label=f'Measured Points {point_y/1e3:.2f} TFLOPs/sec {point_y*100/peak_performance:.2f}%')
plt.xlabel('操作强度 [GFLOPs/GB]', fontproperties=font_prop)
plt.ylabel('性能 [GFLOPs/sec]', fontproperties=font_prop)
plt.title('Roofline 模型', fontproperties=font_prop)
plt.legend(prop=font_prop)
# 保存图片而不显示
plt.savefig('roofline_model.png')
plt.close()
print(f"FLOPs: {flops} FLOPs")
print(f"内存访问量: {memory_access} 字节")
print(f"执行时间: {total_cuda_time:.4f} 秒")
print(f"理论值的:{point_y*100/peak_performance:.2f}%")
parser = argparse.ArgumentParser(description='Process some integers.')
parser.add_argument("--warmup_only", action="store_true", help="warmup_only")
parser.add_argument("--triton_kernel", action="store_true", help="triton_kernel")
args = parser.parse_args()
main(args)
EOF
7.运行测试程序生成Roofline图
python roofline_model.py
python roofline_model.py --triton_kernel
输出
FLOPs: 5497558138880 FLOPs
内存访问量: 8053063680 字节
执行时间: 1.3862 秒
理论值的:29.87%

FLOPs: 5497558138880 FLOPs
内存访问量: 8053063680 字节
执行时间: 1.0957 秒
理论值的:37.80%
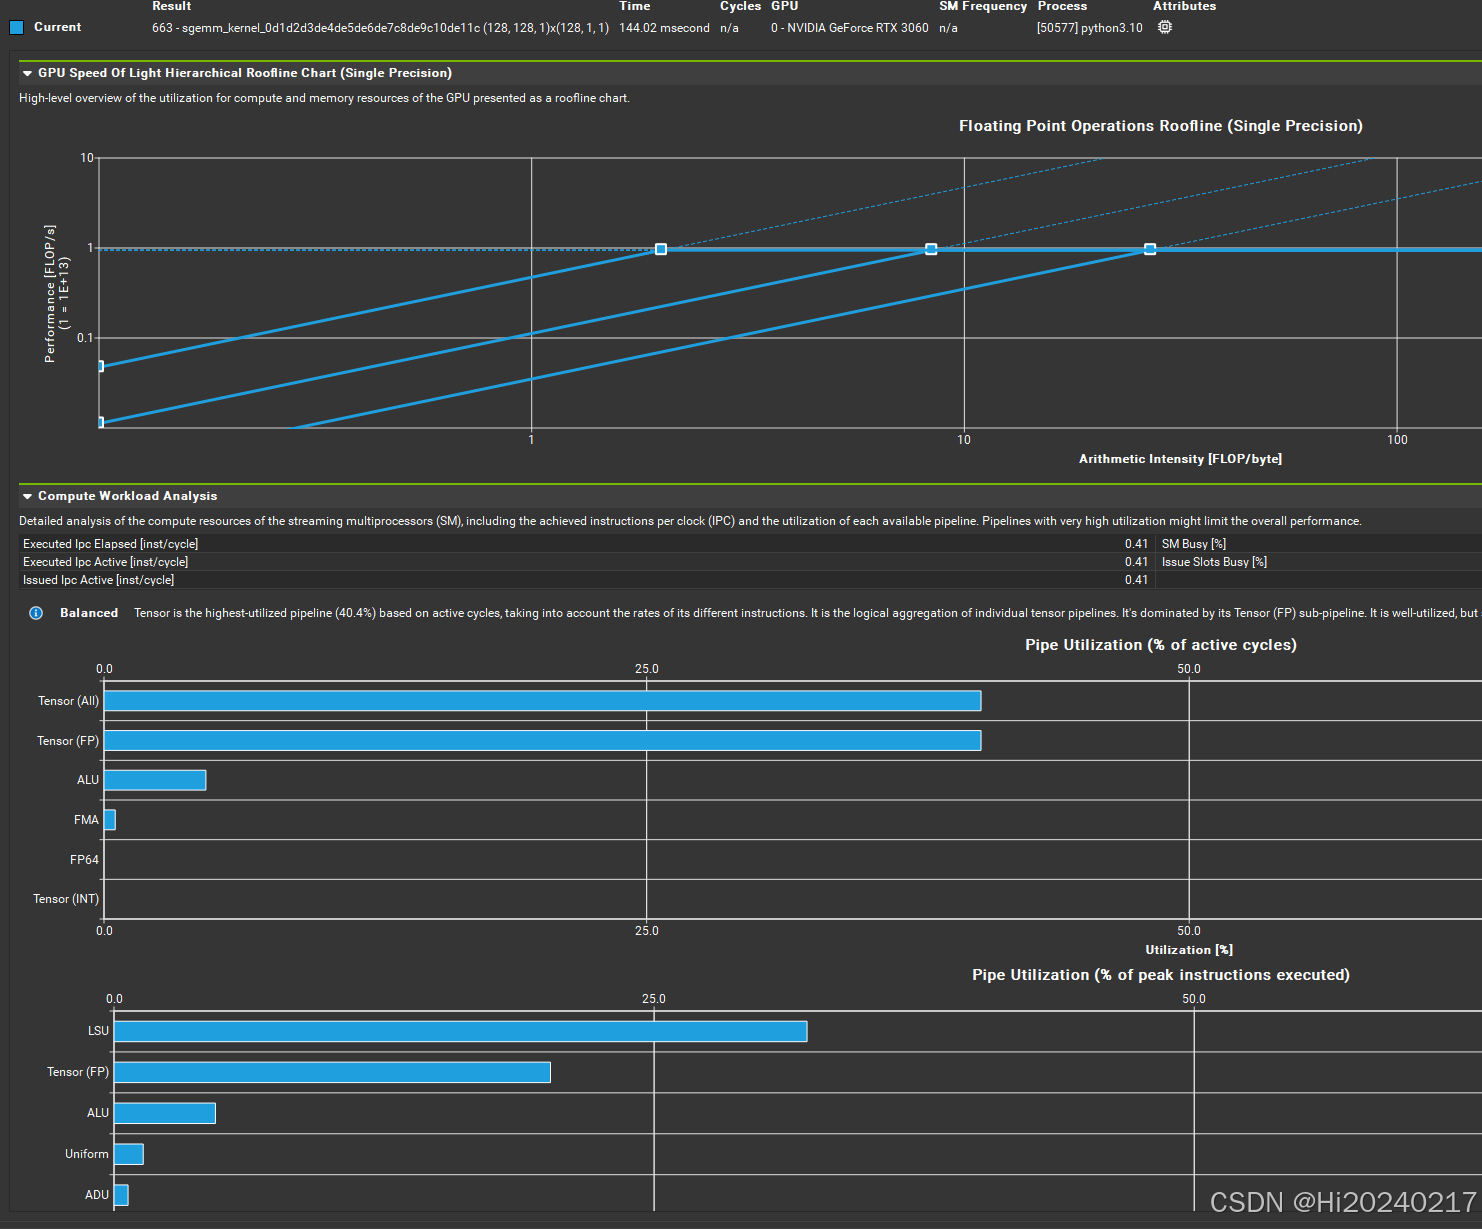
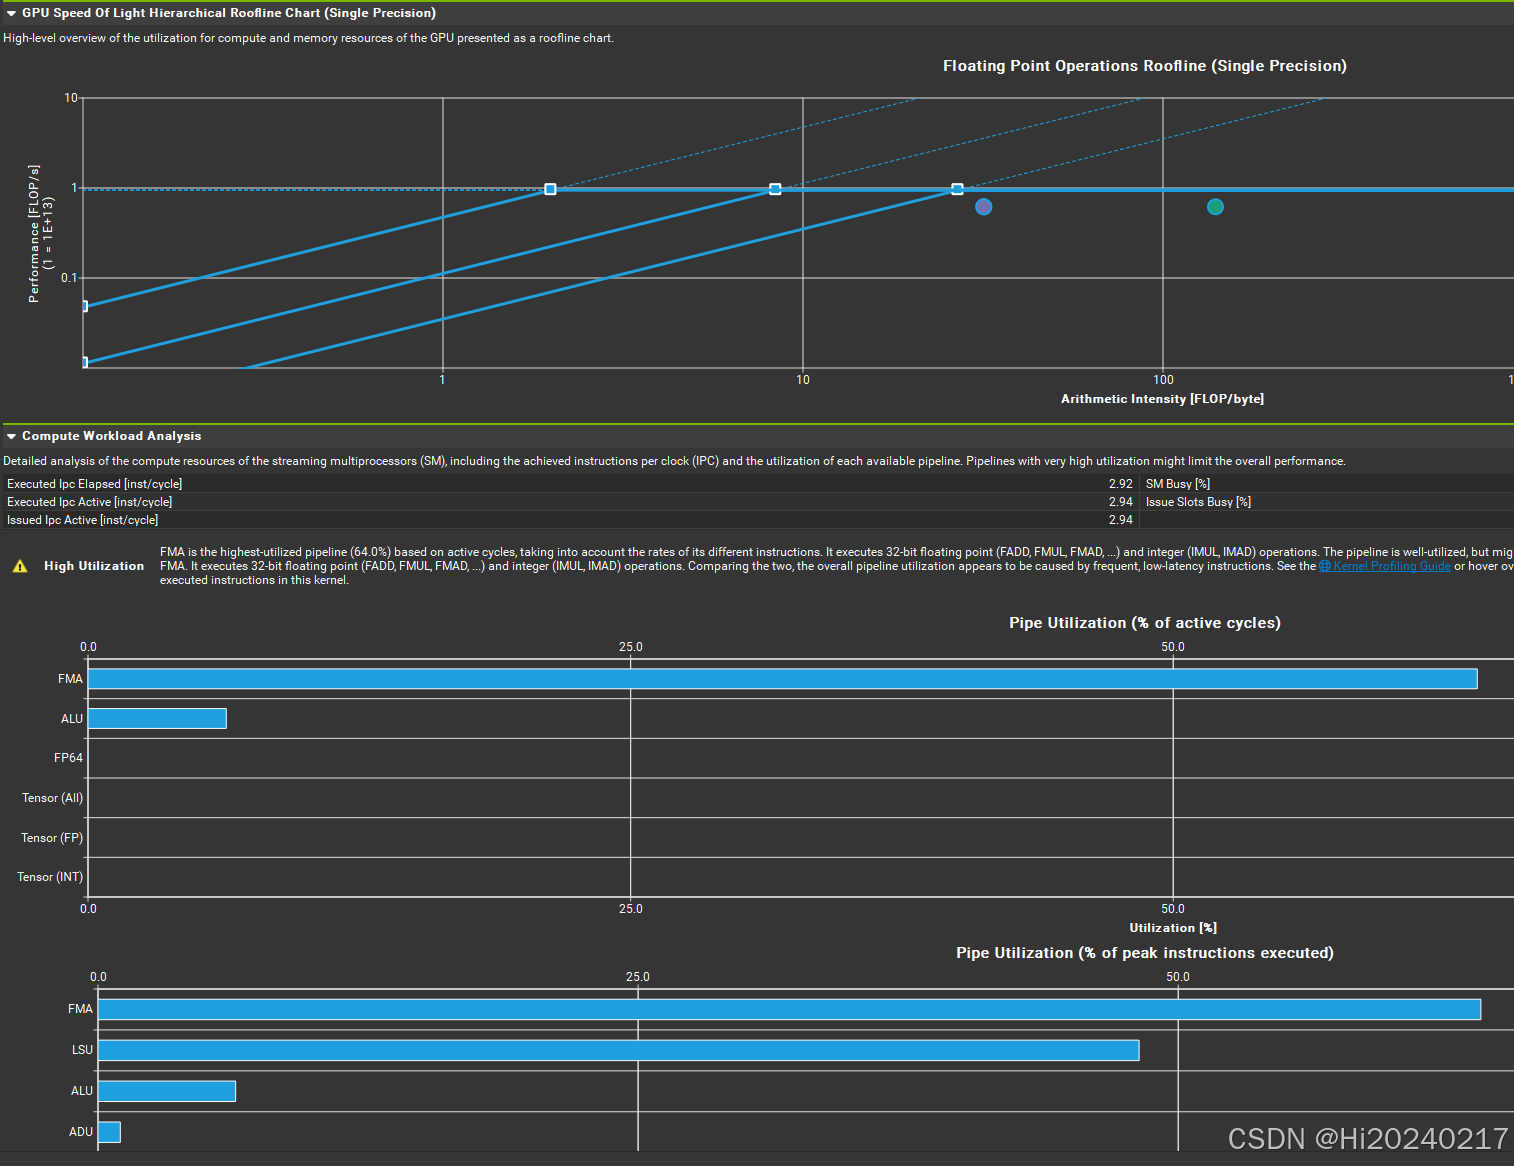
8.NVIDIA Nsight Compute生成Roofline
/usr/local/cuda/bin/ncu -f --section SpeedOfLight_HierarchicalSingleRooflineChart \
        --section ComputeWorkloadAnalysis --section MemoryWorkloadAnalysis \
        --target-processes all --export roofline_report python roofline_model.py --warmup_only


/usr/local/cuda/bin/ncu -f --section SpeedOfLight_HierarchicalSingleRooflineChart \
        --section ComputeWorkloadAnalysis --section MemoryWorkloadAnalysis \
        --target-processes all --export roofline_triton_kernel_report python roofline_model.py --warmup_only --triton_kernel
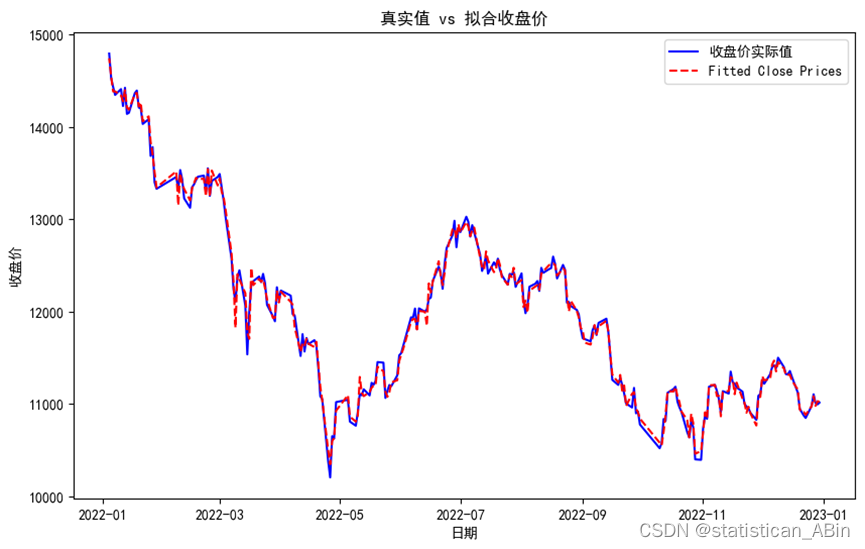
9.效果图
A.nn.Linear
B.Triton实现